背景:
上级领导来公司检查,要求电脑屏保设置指定图片幻灯片。
详细要求:
- 设定为图1.png~图7.png;
- 设定超时1分钟显示图片屏保幻灯片,每30秒换一张;
- 设置恢复时输入开机密码。
首先想到的是最简单的批处理,通过百度知道大师的回答得到bat:用批处理或者VBS脚本设置WIN/XP系统屏幕保护程序、等待时间和恢复时显示密码_百度知道 (baidu.com)
这个脚本只能放在一个文件夹中,诸君需要解压带有bat、屏保程序、图片的压缩包,再进行安装、执行bat,步骤繁琐。
主任要求,需要将诸君当成馬鹿,用以上的方式他们来讲太复杂,需要做到,一键,全部设定!
那就用C#挑战一下吧~
(由于公司都是由ghost装的win7,什么wget、curl都没有,批处理搞不来,.Net2.0还是有的):
- 首先将图片放到公司内外网络都可以访问的OA上,直接用OA中的下载链接直链下载图片,下载到C:/屏保图片;
- 将第三方幻灯片屏保程序也从OA上下载到%SystemRoot%\System32\ssMyPics.scr或%SystemRoot%\SysWOW64\ssMyPics.scr;
- 设定屏保程序、超时时间、恢复时输入开机密码的注册表(可以引用批处理文件);
- 立即生效(这一步网上没有答案,最后找到官方API文档)。
以下是代码,用的是C#控制台应用:
using System;
using System.IO;
using System.Net;
using System.Diagnostics;
using System.Windows.Forms;
using System.Runtime.InteropServices;

namespace 一键设置屏保
{
    class Program
    {

        // user23动态库链接
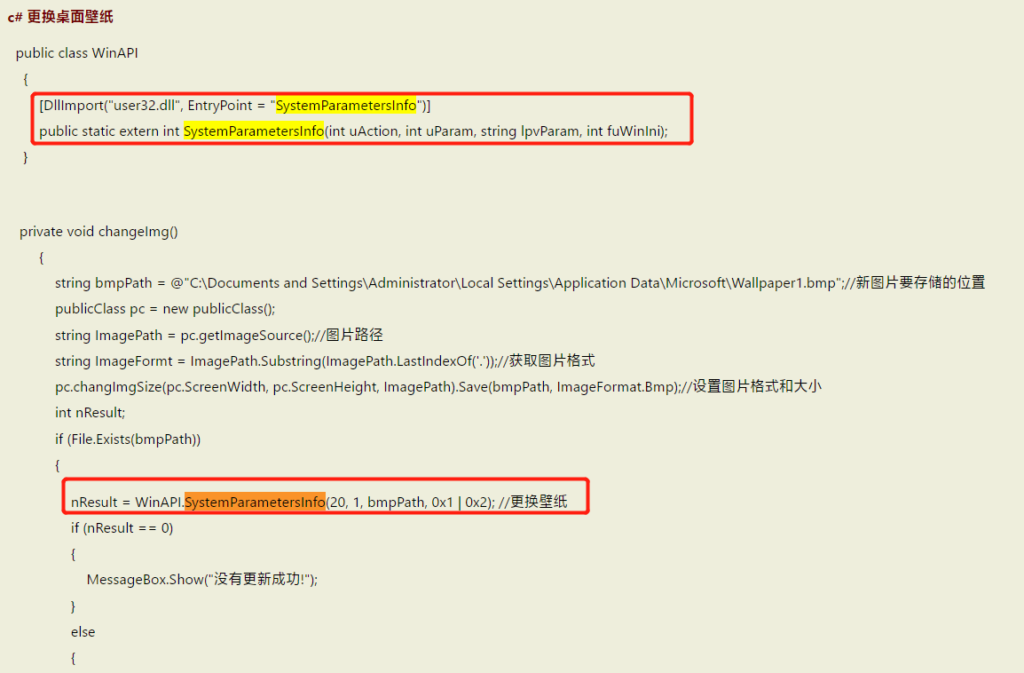
        [DllImport("user32.dll", EntryPoint = "SystemParametersInfo")]
        // SystemParametersInfoA节点
        public static extern int SystemParametersInfo(int uAction, int uParam, string lpvParam, int fuWinIni);
        static void Main(string[] args)
        {
            //Console.WriteLine("按任意键开始");
            //Console.ReadKey(true);
            // filePath 文件路径名
            string filePath = System.Environment.SystemDirectory + "/ssMyPics.scr";
            // picPath 图片文件夹
            string picPath = "C:/屏保图片";
            //判断文件夹是否存在
            if (!Directory.Exists(picPath))
            {
                //创建文件夹
                try
                {
                    Console.WriteLine(picPath + "  屏保文件夹不存在!");
                    Directory.CreateDirectory(picPath);
                    Console.WriteLine(picPath + "  屏保文件夹创建成功!");
                }catch(Exception e){
                }
            }
            Console.WriteLine(picPath + "  屏保文件夹存在!");
            Console.WriteLine("正在下载第一张图...");
            WebClient client = new WebClient();
            client.Credentials = CredentialCache.DefaultCredentials;
            client.DownloadFile("第一张图链接", picPath + "/20230617-01.png");
            Console.WriteLine("第一张图下载完成");
            // ...
            Console.WriteLine("正在下载第七张图...");
            client.DownloadFile("第七张图链接", picPath + "/20230617-07.png");
            Console.WriteLine("第七张图下载完成");
            // 这里原来是用来判断32位或64位屏保文件安装位置的,但是发现用System.Environment.SystemDirectory 后不需要了
            /*if (IntPtr.Size == 8){
                // 64
                filePath = Environment.SpecialFolder.System + "\\SysWOW64\\ssMyPics.scr";
            } else {
                // 32
                filePath = Environment.SpecialFolder.System + "\\System32\\ssMyPics.scr";
            }*/
            if (!File.Exists(filePath))
            {
                Console.WriteLine(filePath + "  屏保程序不存在!");
                //FileStream fs = File.Create(filePath);// 创建文件位置测试
                //fs.Close();
                Console.WriteLine("正在下载屏幕保护程序...");
                client.DownloadFile("ssMyPics.scr屏保程序,下面会分享", filePath);
                Console.WriteLine("屏幕保护程序下载完成");
            }
            else
            {
                Console.WriteLine(filePath + "  屏保程序存在!");
                //执行读写操作
            }
            //批处理文件创建
            Console.WriteLine("创建批处理文件...");
            string cmdFileContent = "【这里批处理文件太长+折叠不美观,我会在下面列出】";
            // 批处理写入
            WriteBatFile(picPath + "/setting.bat", cmdFileContent);
            // 批处理执行
            RunBat(picPath + "/setting.bat");
            // 用SystemParametersInfoA节点操作
            // 设置屏保显示超时时间
            SystemParametersInfo(15, 60, "", 1);
            // 设置勾选屏保结束后显示登录界面或输入密码
            SystemParametersInfo(119, 1, "", 1);
            // 启动屏保测试
            // Process p = Process.Start(filePath);
            // p.WaitForExit();
            Console.WriteLine("设置完成!");
            Console.WriteLine("点击任何按键退出");
            MessageBox.Show("设置完成!");
            // Console.ReadKey(true);
            return;
        }

        //执行bat批处理
        public static void RunBat(string filePath)
        {
            ProcessStartInfo myBat = new ProcessStartInfo()
            {
                FileName = filePath,
                WorkingDirectory = Directory.GetCurrentDirectory(),
                UseShellExecute = false,
                //运行时隐藏dos窗口
                //CreateNoWindow = true,
                //设置该启动动作,会以管理员权限运行进程
                Verb = "runas",
            };
            Process.Start(myBat).WaitForExit();
        }

        //批处理文件创建
        public static void WriteBatFile(string filePath, string fileContent)
        {
            File.Delete(filePath);
            FileStream fs1 = new FileStream(filePath, FileMode.Create, FileAccess.Write);//创建写入文件
            StreamWriter sw = new StreamWriter(fs1, System.Text.Encoding.GetEncoding("GB2312"));
            sw.WriteLine(fileContent);//开始写入值
            sw.Close();
            fs1.Close();
        }
    }
}
批处理文件源码(By 依梦琴瑶 已修改部分):
@echo off & title 一键设置指定图片目录为屏幕保护
::设置包含图片文件夹的主目录路径,留空为当前脚本所在目录
set ImageDir=
::设置显示屏保时的等待时间(分钟),有效值(1-9999)
set TimeOut=1
::设置是否启用登录屏幕,1 启用,0 禁用
set Login=1
::是否立即生效,1 立即(系统将会注销当前帐户),其它数字下次开机后生效
set Effective=1
::设置图片更换频率(毫秒),有效值(6000 - 180000)
set Interval=6000
::设置图片在屏幕上显示的尺寸大小(%),有效值(25 - 100)
set Percent=100
::设置是否拉伸图片,1 允许,0 拒绝
set Stretch=0
::设置是否显示图片名,1 显示,0 隐藏
set ShowName=0
::设置是否禁用过渡效果,1 禁用,0 启用
set Transition=1
::设置是否使用键盘滚动浏览,1 启用,0 禁用
set Control=1
::1 跳转,0 忽略
set Pay=1
::主执行代码,如非必要,请勿修改,以免执行出错。
set "ScrFile=C:\Windows\System32\ssMyPics.scr"
if not exist "%ScrFile%" (
    color 0C & title 缺失图片收藏幻灯片(ssMyPics.scr)屏幕保护程序 By 依梦琴瑶
    echo 如果您使用的是Vista,及其以上的系统,由于系统自带的
    echo “照片”(PhotoScreensaver.scr^)屏幕保护程序,不能使用
    echo 命令方式进行设置,所以我将会使用XP系统上的图片屏幕保
    echo 护程序来实现设置,但由于您系统中缺失了ssMyPics.scr,
	echo 请先双击文件夹中的ssMyPics_Install.exe进行安装,
	echo 安装后再运行脚本。
    :: pause
	exit
)
cd /d "%~dp0" & color 0a
if not defined ImageDir set "ImageDir=%cd%"
if not exist "%ImageDir%" (
    color 0C & title 路径不存在
    echo 设置的图片主目录路径不存在
    ping 127.0.0.1 -n "4">nul
    exit
)
set /a TimeOut*=60
set "Key=HKCU\Control Panel"
set "SSS=Screen Saver.Slideshow"
reg add "%key%\Desktop" /v SCRNSAVE.EXE /t REG_SZ /d "%ScrFile%" /f
reg add "%key%\Desktop" /v ScreenSaveTimeOut /t REG_SZ /d "%TimeOut%" /f
reg add "%key%\Desktop" /v ScreenSaverIsSecure /t REG_SZ /d "%Login%" /f
reg add "%key%\%SSS%" /v ChangeInterval /t REG_DWORD /d %Interval% /f
reg add "%key%\%SSS%" /v MaxScreenPercent /t REG_DWORD /d %Percent% /f
reg add "%key%\%SSS%" /v AllowStretching /t REG_DWORD /d %Stretch% /f
reg add "%key%\%SSS%" /v DisplayFilename /t REG_DWORD /d %ShowName% /f
reg add "%key%\%SSS%" /v DisableTransitions /t REG_DWORD /d %Transition% /f
reg add "%key%\%SSS%" /v AllowKeyboardControl /t REG_DWORD /d %Control% /f
reg add "%key%\%SSS%" /v ImageDirectory /t REG_SZ /d "%ImageDir%" /f
echo 完成!
突破:
由于更新注册表后,必须要注销,主任说注销很麻烦,有时候没保存文件、开机很慢,用户又要发牢骚。行。
网上给出的答案什么重启explorer(无效)、更新组策略(根本没有对组策略进行变更)、F5刷新桌面(关刷新桌面什么事)……都没用,直到,找到一篇:systemparametersinfo详细(更改屏保设置)_蝈蝈(GuoGuo)的博客-CSDN博客,让我有了灵感,找到了官方接口文档:SystemParametersInfoA 函数 (winuser.h) – Win32 apps | Microsoft Learn。
文档中对博客中的修改屏保等待时间的功能接口进行了解释:


16进制的0x00F就是10进制的15,由此可以知道如何调用这个方法。随后找到修改0x77,10进制119,即SystemParametersInfo(119, 1, "", 1);即可,1是True,0是False。


在文章:c# 更换桌面壁纸 – 徐驰 – 博客园 (cnblogs.com)中了解C#调用方法。
最后测试可行!
以下是屏保安装程序和屏保scr下载链接:
分享名称:屏保程序 分享链接:https://kb.itpno.com/#s/9X4uYyUg 访问密码:iTPno.
附加设置壁纸批处理:
reg add \"hkcu\\control panel\\desktop\" /v Wallpaper /d \"%~dp0壁纸.png\" /f \r\nRunDll32.exe USER32.DLL,UpdatePerUserSystemParameters\r\ntaskkill /f /im explorer.exe\r\ncmd /c start explorer\r\necho 壁纸更换完成!


